
Modern Web Weekly #58
The modern web, tested and explained in plain English

Web apps added to the Dock on macOS, use scope
On macOS, you can now add web apps to the Dock and these apps will behave like PWAs. If you have a manifest, it will take the icons and other configurations from there, but you can also “install” web apps that don’t have a manifest and/or service worker.
An added benefit of these web apps on macOS is that any link that is clicked outside a browser and that is within the scope of a web app added to the Dock, will open in that app.
So if someone sends you an in-scope URL in an email for example and you click it, the installed web app will open instead of the web app in a browser. This is not related to the handle_links property of manifest.json, as this is not supported by Safari.
While testing, I discovered behavior that is important to know whenever you host multiple PWAs on the same domain. While I advise you to host PWAs on a subdomain like app1.example.com and app2.example.com whenever you want to use the same top-level domain, there can be situations where this is not feasible.
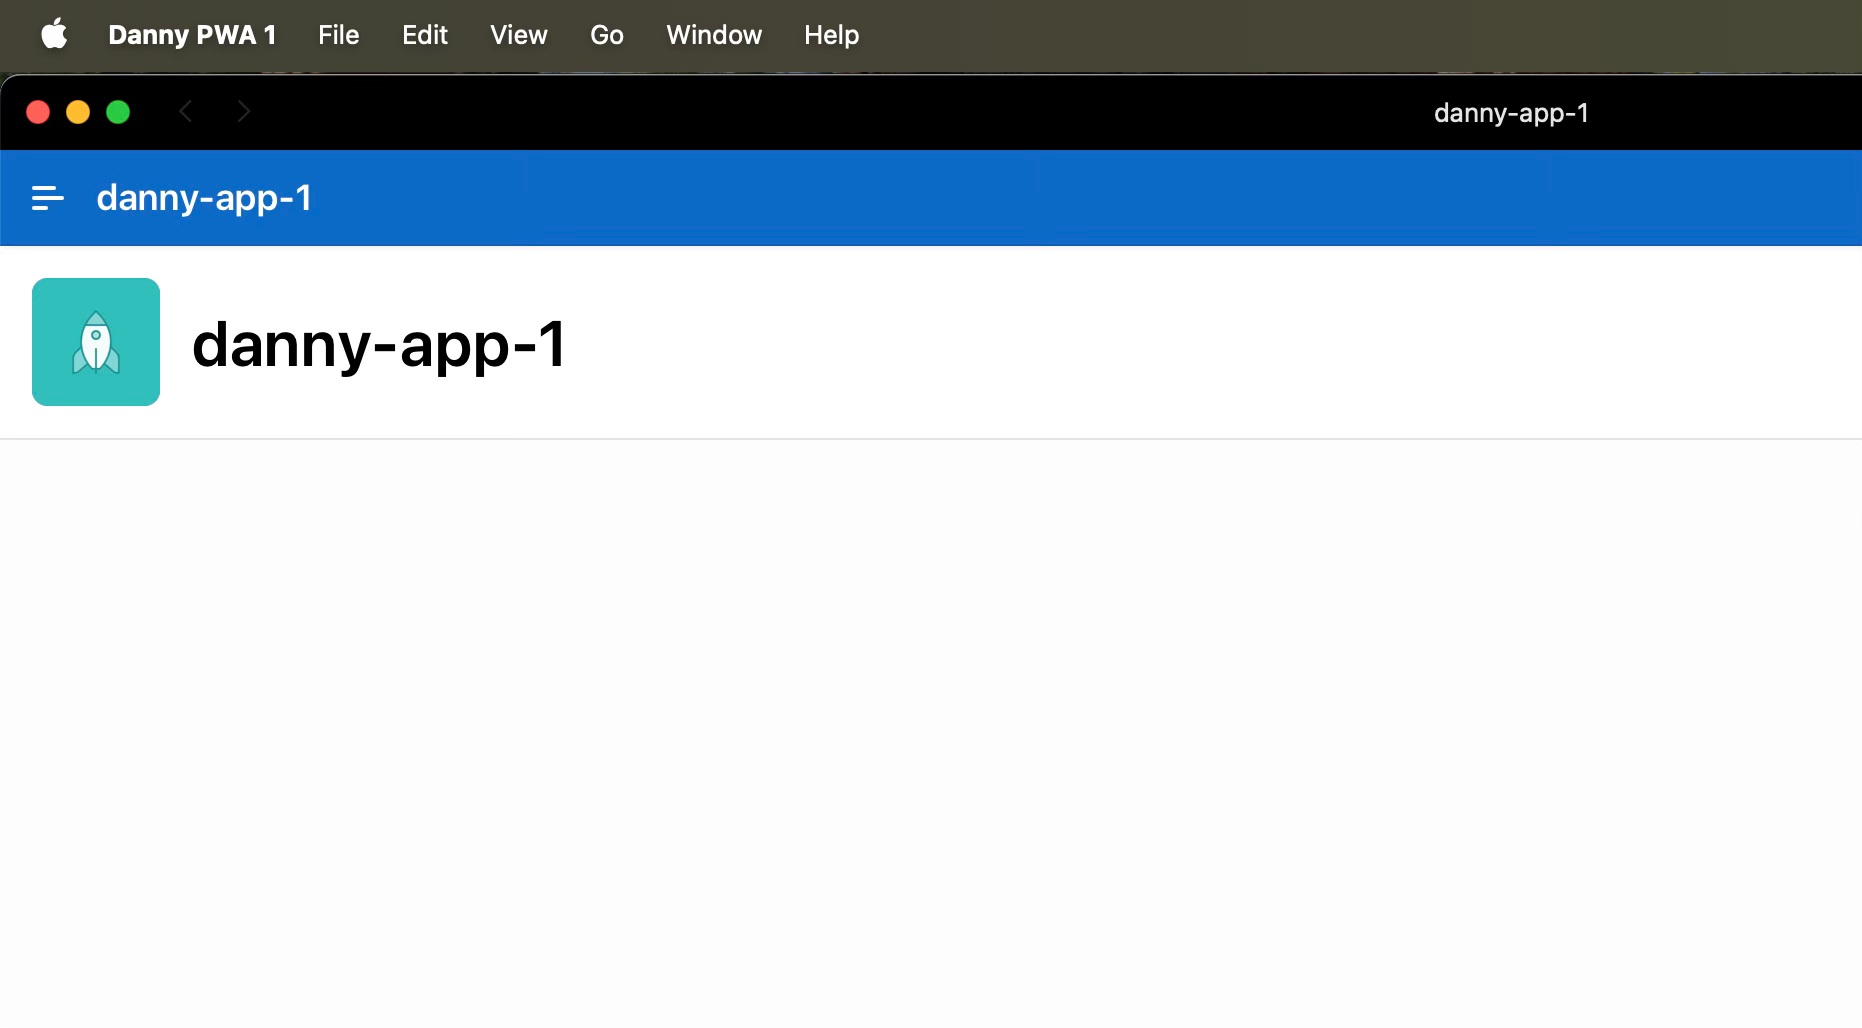
I created two simple PWAs using Oracle APEX and added them to the Dock on macOS:


When opening both apps on macOS, I noticed that when opening the apps for the first time, everything was okay:
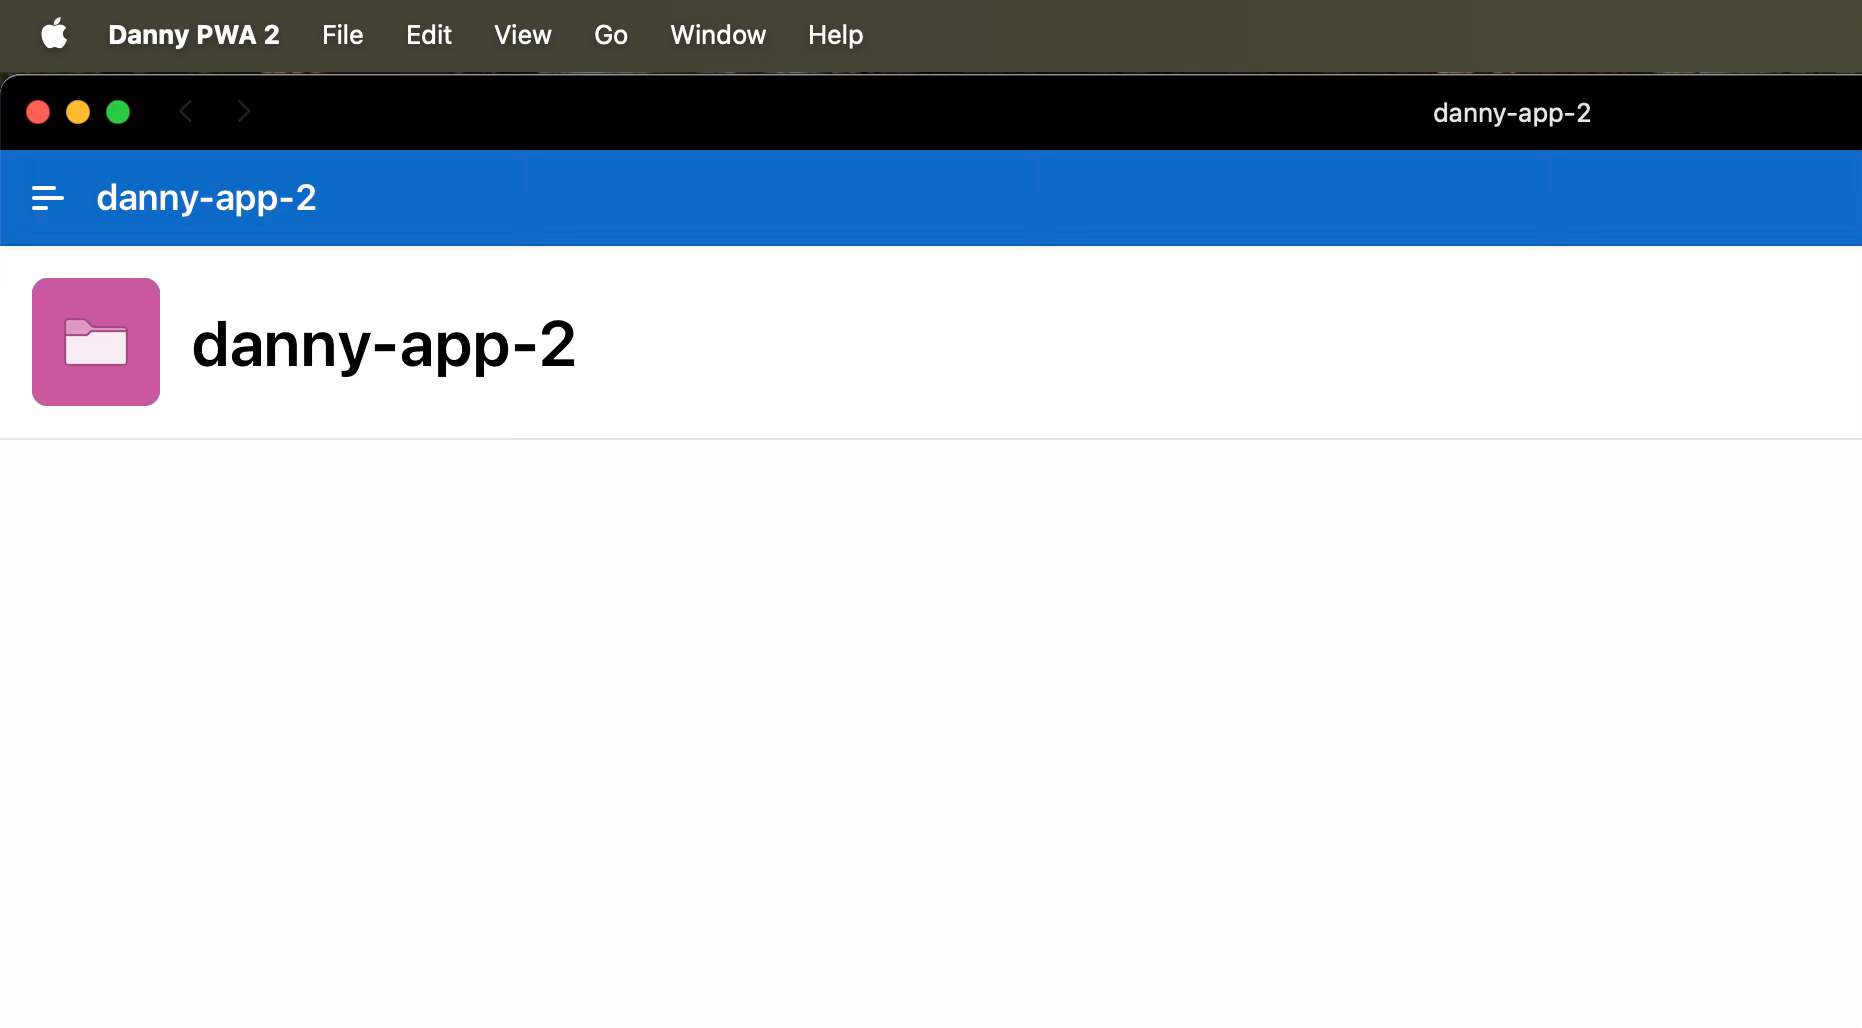
But when I opened the second app for the second time, it was opened with the setting of the first web app, like the name and its shortcuts:
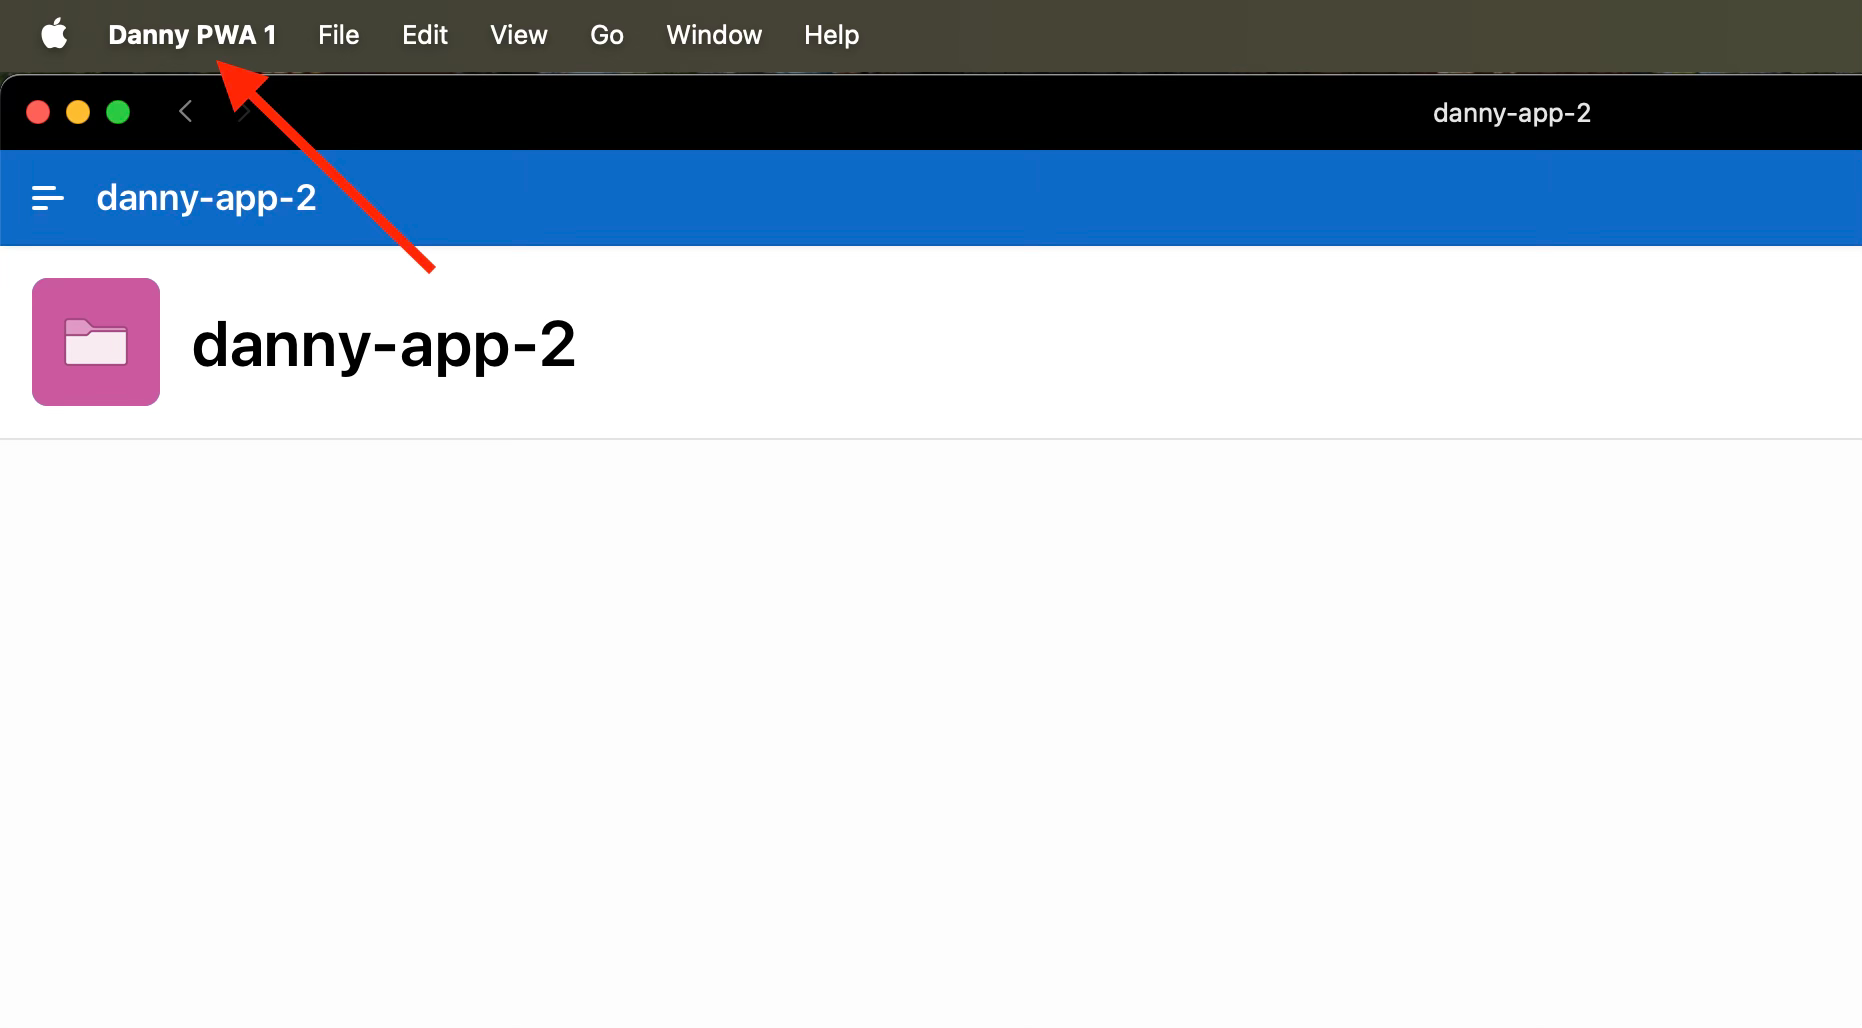
This is because the web apps were hosted on the same domain with a similar URL like https://apex.oracle.com/foo/bar/app1 and https://apex.oracle.com/foo/bar/app2 which apparently confuses macOS.
Again, I advise you to host both apps on a subdomain like app1.example.com and app2.example.com, but if this is not possible for whatever reason, you should add the scope member to manifest.json to distinguish both web apps.
So this means that for app1, the value of scope in manifest.json should be:
"scope": "/foo/bar/app1"and for app2 this should be:
"scope": "/foo/bar/app2"This fixes the problem on macOS.
You may not need that event handler
Do you write a lot of event handlers?
There might be a better alternative for this now that there is broad browser support for the Popover API, Invoker Commands API and the Observable API. These APIs help you to declaratively invoke actions on elements and make event handling much more powerful.
Let’s have a look!
Popover API
When you need to show or hide a popover, you no longer need an event handler to do so. You can simply use the popovertarget and popovertargetaction attributes to declaratively set this up:
<!-- toggle the tooltip -->
<button popovertarget="tooltip">?</button>

<!-- show the tooltip -->
<button
  popovertarget="tooltip"
  popovertargetaction="show">Show</button>

<!-- hide the tooltip -->
<button
  popovertarget="tooltip"
  popovertargetaction="hide">Hide</button>

<div id="tooltip" popover>
  I am a tooltip
</div>
popovertarget takes the id of the popover element and popovertargetaction specifies the action to invoke.
While you can also show and hide the popover with an event handler, you don’t need one in this case.
The Popover API is supported in all modern browsers.
Check out this codepen for a demo.
Invoker Commands API
The Invoker Commands API is similar to the Popover API in the sense that it enables web apps to declaratively define actions to invoke. It works with the command and commandfor attributes that take the name of the command and the id of the element to execute the command for respectively:
<!-- show the modal -->
<button commandfor="my-modal" command="show-modal">Show dialog</button>

<!-- show the popover -->
<button commandfor="popover" command="show-popover">
  Show popover
</button>

<!-- hide the popover -->
<button commandfor="popover" command="hide-popover">
  Hide popover
</button>

<dialog id="my-modal">
  <p>This is a dialog</p>

  <button commandfor="my-modal" command="close">
    Close
  </button>
</dialog>

<div id="popover" popover>This is a popover</div>
command takes a value from a list of possible values that is regularly updated when browsers support more pre-defined actions. Safari currently supports a list of camelCased values but future versions wil support the kebab-cased values.
In addition to these pre-defined values, command can also take a custom command that needs to be prefixed with a double-dash, just like CSS Custom Properties.
In this case, an event handler is needed, but the added benefit is that a single event handler for the command event is now set on the target of the event, instead of all individual buttons that invoke a command:
<output id="counter">1</output>

const counter = document.querySelector('#counter');

counter.addEventListener('command', (e) => {
  const {command} = e;

  if(command === '--decrement-value') {
    counter.value = parseInt(counter.value) - 1;
  }

  if(command === '--increment-value') {
    counter.value = parseInt(counter.value) + 1;
  }
});
The Invoker Commands API is supported in all Chromium-based browsers and Safari.
Check out this codepen for a demo.
Observable API
The Observable API adds a when() method to HTMLElement which takes the name of an event and returns a new Observable that adds an event handler to the element when its subscribe() is called.
You can then call methods like filter, map, reduce and takeUntil to turn event handling into a declarative flow that’s much easier to reason about and to compose.
For example, here’s how you can add a click event handler to a container and only handle the event when it takes place on a child element that has class=”foo” using the filter method:
container
  .when('click')
  .filter((e) => e.target.matches('.foo'))
  .map((e) => ({ x: e.clientX, y: e.clientY }))
  .subscribe({ next: handleClickAtPoint });
After filtering, we return the clientX and clientY properties of the event using map() and send this data to the handleClickAtPoint() function.
Observable has other useful methods like takeUntil that invoke the handler function until another event takes place. For example, here’s how you can handle the mousemove event on <body> until the mouseup event takes place, after which mousemove will no longer be handled:
document.body
  .when('mousemove')
  .takeUntil(document.when('mouseup'))
Check out this codepen for an example of how you can handle drag-and-drop with Observable. Notice that the flow is much easier to understand and reason about then with regular event handlers.
The Observable API is supported in all Chromium-based browsers and Safari.
This demo contains two polyfills for HTMLElement.when and Observable.takeUntil that are not yet supported by Safari.
Modern Web Weekly Chat
The Modern Web Weekly chat is now available for all subscribers, a community where you can engage, ask questions, and have direct access to me.
I will try to answer your questions and occasionally post videos and podcasts to address questions directly.
Join here:

Dead simple syntax highlighting with the CSS Custom Highlight API
If you have ever looked into the code of syntax highlighters like Prism.js for example you know that syntax highlighting is not an easy task. The text to be highlighted needs to be tokenized (broken into separate parts that need to be highlighted) and then those parts need to be wrapped in <span> elements that can be styled with different text colors.
This not only drastically increases the size of the HTML, but it also poses problems when you need the HTML output because it now contains all those extra <span>elements that you probably don't want.
The text editor Monaco that powers VS Code uses a slightly different approach where the highlighted parts are placed into a separate part of the DOM tree and then the text and highlighted parts are placed over each other. This keeps the output clean but you can already see how this introduces a lot of complexity.
The CSS Custom Highlight API solves this problem by enabling web apps to register arbitrary text ranges that can be styled with CSS. Browsers already provide a similar mechanism to highlight ranges with pseudo-elements like ::selection and ::target-text for example and this API extends this concept to arbitrary text ranges.
How it works
To highlight text, you first create a Range object with JavaScript:
const range = new Range()You can then select a Node or parts of it by using its setStart() and setEnd()methods. The first argument for both methods is the Node in which the Range should start and the second argument is the offset for the start of the Rangecalculated from the starting node.
Let's look at an example to see what this means given the following paragraph:
<p>
  this<br>
  is<br>
  the<br>
  text<br>
</p>
This paragraph has 8 nodes: the text nodes this, is, the and text and four <br>elements. If we want the range to contain the first four nodes we start with the Node at position 0 and end at position 4:
const p = document.querySelector('p');
const range = new Range();

// start at the first node (position 0: "this")
range.setStart(p, 0);

// end at the fourth node (position 4: <br>)
range.setEnd(p, 4);
Now that we have a Range and added nodes to it, let's create a highlight for the range and register that highlight with the name test-highlight. We register the highlight with the HighLightRegistry that is available at CSS.highlights:
// create a highlight for the range
const highlight = new Highlight(range);

// register the hightlight with the name "test-highlight"
CSS.highlights.set('test-highlight', highlight)
Now we can style the highlight with CSS using the ::highlight pseudo-element:
/* style the highlight called "test-highlight" */
::highlight(test-highlight) {
  background-color: yellow;
  color: red;
}
Now the nodes that were added to the Range have red text on a yellow background.
Here's a codepen that demonstrates this:

You can add multiple ranges to a Highlight by passing them to its constructor or create an empty Highlight by not passing any Range objects at all:
// add multiple ranges to Hightlight
const highlight = new HighLight(range1, range2, ...);

// create an empty Highlight
const highlight = new HighLight();
And you can add ranges to a Highlight using its add method. This method can only take a single Range but you can chain the method calls:
const highlight = new Highlight();

hightlight.add(range1);

highlight.add(range2).add(range3);
After a Highlight has been registered with the HighlightRegistry you can retrieve it using its get method:
// register the Highlight
CSS.highlights.set('test-highlight', highlight)

// retrieve the Highlight by name
CSS.highlights.get('test-highlight')
Creating a syntax highlighting component
In the What PWA Can Do Today app I use a <code-snippet> web component that uses the Prism.js library for syntax highlighting and I decided to create a new component that uses the CSS Custom Highlight API.
It still uses the code from Prism.js that tokenizes the code to be highlighted but uses the CSS Custom Highlight API for all the syntax highlighting.
Prism.js defines a list of token types that correspond to the various parts of JavaScript, CSS, and HTML like comment, tag, parameter, property, operator, etc.
We use these token types as the names of the Highlight objects we need to create. We will iterate through the list of token types and then register a Highlight for it that is initially empty:
// the list of token types we will regiser a Highlight for
const tokenTypes = [
  'comment',
  'cdata',
  'property',
  'tag',
  'parameter',
  'class-name',

   ...
];

// loop over the list and register an initially empty Highlight
tokenTypes.forEach(tokenType => {
  CSS.highlights.set(tokenType, new Highlight());
});
We then tokenize the text to be highlighted which will return an array of token objects that have a type, content, length, and optional alias property. We will iterate over these tokens and create a Range for each token in the source text. Then a Highlight will be registered for this Range with the name defined in token.typeor token.alias:
const textNode = /* the HTML element holding the text to be highlighted */
const textContentNode = textNode.firstChild

const code = textNode?.textContent ?? '';

// get the tokens
const tokens = this.tokenize(code, 'javascript');

let pos = 0;

for(const token of tokens) {
  if(token.type) {
    const range = new Range();

    // set the start of the range
    range.setStart(textContentNode, pos);

    // set the end of the range (start pos + the token lenght)
    range.setEnd(textContentNode, pos + token.length);

    // add the range to the correct Highlight
    CSS.highlights.get(token.alias ?? token.type)?.add(range);
  }

  // starting position for the next token
  pos += token.length;
}
And this is how you can replace syntax highlighting by injecting <span> elements for styling with a pure CSS solution 💪
You can find the <code-snippet> web component here on Github:

PWA Audit: on your way to a great PWA
Do you already have a PWA, but are you running into issues with performance, security, or functionality? Or are you not sure how to make your PWA better?
I can help you by running an audit of your PWA
I will evaluate it on more than 35 criteria and provide you with clear and actionable instructions on how to improve it. No generic stuff that you can get anywhere, but an in-depth quality checkup to get you on your way to a great PWA.
Some of the criteria I will evaluate it on are:
Installability
Cross-device and cross-platform compatibility
Offline support
Usability
Effective use of modern web APIs
Performance
Security
Your investment in the improvement of your PWA through the audit is €599 excluding VAT (where applicable).
If you want to request an audit or first would like to know more, you can
fill out the form or book a call with me.
