

Finally, a customizable <select>
After what seemed like an eternity, it looks like we'll finally get a fully stylable and customizable <select> on the web.
I know, we should have had this 20 years ago. Standards take time and this took a looooong time.
Anyway, it's now in Chrome 134 and I must say it looks promising! Let's dive in...
To opt-in to the new customizable <select> add this to your CSS:
select,
::picker(select) {
  appearance: base-select;
}
This will add the new ::picker(select) pseudo-element that represents the popover containing the <option> elements.
With default styling, the <select> with appearance: base-select doesn't look very different from the regular version, but things get interesting when we customize it further.
We can add a <button> that will open the select and inside it, we can place a <selectedcontent> element, which will contain the currently selected <option>. Inside this <button> we can place a custom indicator to indicate the open and closed state of the <select>. The default arrow indicator can be hidden with:
::picker-icon {
  display: none;
}
The <select> could now look something like this:
<select>

  <!-- button to open and close the select -->
  <button>

    <!-- element where the selected option will be placed -->
    <selectedcontent></selectedcontent>

    <!-- custom arrow indicator -->
    <span class="arrow"></span>
  </button>

  <!-- options -->
  <option value="1">
    Option 1
  </option>
  <option value="2">
    Option 2
  </option>
  <option value="3">
    Option 3
  </option>
  <option value="4">
    Option 4
  </option>
</select>
Keep in mind that only the contents of the selected <option> will be placed inside <selectedcontent> and not the <option> element itself. This is important to know when you want to style the contents of <selectedcontent>.
In the screenshot below, the second <option> is selected:

<select> with contents of selected <option> in <selectedcontent>By default, a checkmark is shown in front of the selected <option>:

<option>If needed, you can hide this checkmark with:
option::checkmark {
  display: none;
}
Adding HTML elements to <option>
In addition to text, you can now also add other HTML elements to <option>. Here's an example of a currency picker using flag images that I adapted from an example by Una Kravetz:

<select> as a currency picker with flag imagesYou can now simply accomplish this by placing the needed HTML elements inside <option> and style them with CSS:
<option value="eur">
  <img src="europe.png">
  <div class="currency">
    <div class="currency-short">EUR</div>
    <div class="currency-long">Euro</div>
  </div>
  <div class="symbol">€</div>
</option>
option {
.currency {
flex-grow: 1;
}
.currency-long {
color: #595959;
}
.symbol {
justify-self: end;
}
}Standing on the shoulders of giants
Internally, the customizable <select> uses Anchor Positioning to anchor the ::picker(select) pseudo-element to it and the Popover API to position it in the top layer, above all other elements on the page.
This is important to know if you want to animate the opening and closing of the picker, which is now possible as well!
Let's implement a nice sliding transition where the picker's height is animated and the <option> elements inside it slide down. To do this, we can place a <div> around the <option> elements and then give this <div> the following CSS:
display: flex;
flex-direction: column;
justify-content: flex-end;
which aligns the <option> elements to the bottom so they'll slide down when the picker is opened by expanding its height.
We can do this by simply wrapping the <option> elements inside a <div> because any content that is placed inside the <select> outside the <button> will be automatically placed inside ::picker(select):
<div class="options">
  <option value="1">
    Option 1
  </option>
  <option value="2">
    Option 2
  </option>
</div>
Even though the <div> will be placed inside ::picker(select), it needs to be styled with select .options and not select::picker(select) .options so it will look like this:
select .options {
  display: flex;
  flex-direction: column;
  justify-content: flex-end;
}
We will then define the styles for ::picker(select) by setting its height to 0 and defining the transitions:
::picker(select) {
  height: 0;
  min-height: 0;
  transition-property: height, overlay, display;
  transition-duration: .3s;
  transition-behavior: allow-discrete;
}
In addition to height, we also need to set overlay and display as transition properties because the picker will not have display by default and it will be moved to the top layer when shown. For that reason, we need to transition these properties as well, otherwise the transition will be instant.
To indicate we want to allow transitioning of overlay and display, which are discrete properties, we set transition-behavior to allow-discrete. The property min-height: 0 is needed for a smooth transition.
Since the picker doesn't have display when it's not shown, we need to define a @starting-style rule for it because only elements that have display can be animated. This rule defines the property and value we want to transition from, in our case height: 0:
@starting-style {
  ::picker(select) {
    height: 0;
    min-height: 0;
  }
}
Finally, we need to define the property and value we want to transition to, in our case the height of the picker when the <select> is open:
select:open::picker(select) {
  height: auto;
}
To enable transitioning to a keyword like auto, we need to set this CSS as well:
:root {
  interpolate-size: allow-keywords;
}
And with that, we now have a smooth sliding <select>! 💪

<select> with animated open and close transitionsBut there is a small issue: the animated opening of the <select> happens only once. When it has been opened and closed once, the opening after that is always instant. This was working before and I’m still investigating what has changed.
If you have a clue, let me know!
Here's the codepen:

All my Medium articles for $29
I write articles on Medium.com about PWAs, Web Components, and new and experimental browser features. To read these articles, you need to be a paid member of Medium ($60 per year) but I now offer all articles I wrote so far in PDF.
In these articles, you learn about PWAs, new and exciting browser features, Web Components, and other features to make great web apps. The articles contain a ton of code examples, YouTube videos, and codepens you can run and edit.
I also give my opinion and offer an overall analysis of the modern web platform in general. You will learn a LOT!
You can now get all these articles for only $29 with the discount code SUBSTACK.
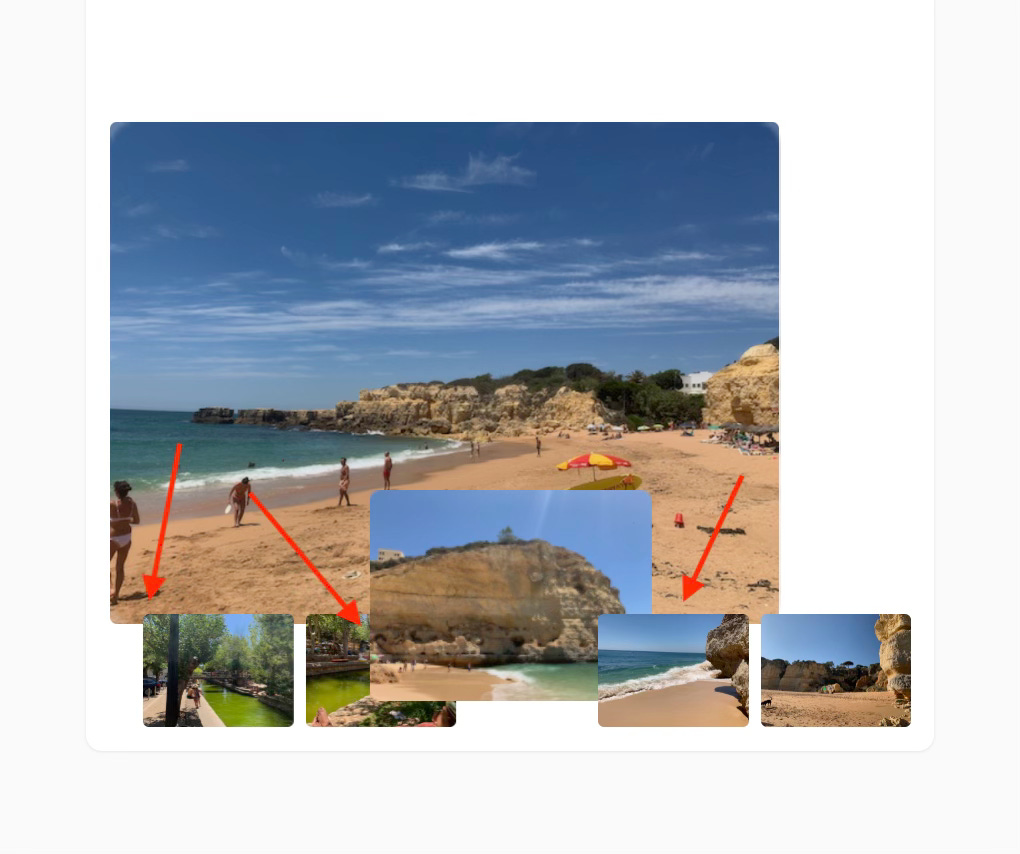
Image gallery with view transitions
I created a very neat image gallery that uses view transitions to transition images from the list of thumbnails to the main image and back. Here’s how it looks:
Thanks to view transitions, an animated gallery like this is quite simple to implement. At its base, this is just a gallery where the clicked thumbnail and the main image are swapped.
To accomplish this, we add a click event handler to the <div> holding the thumbnails and get the clicked image from the event. We then get a reference to the main image, which is the image that is the direct child of the gallery element.
Then we append the main image back to the thumbnail container and move the thumbnail as the main image to the gallery. By wrapping this in document.startViewTransition, the change is animated:
// the gallery holding the main image
const gallery = document.querySelector('.gallery');

// the <div> holding the thumbnails
const thumbnailsContainer = document.querySelector('.thumbnails');

thumbnailsContainer.addEventListener('click', async (e) => {
  if (e.target.tagName === 'IMG') {

    // get the clikced thumbnail
    const thumbnail = e.target;

    // get the main image
    const mainImage = gallery.querySelector(':scope > img');

    const transition = document.startViewTransition(() => {
      // move the main image back to the thumbnails
      thumbnailsContainer.appendChild(mainImage);

      // move the thumb to the gallery as main image
      gallery.insertAdjacentElement('afterbegin', thumbnail);
    });
  }
});
When appendChild is used on an element that is already in the document, it’s moved instead of added again so we don’t need to worry about double images. To move the thumbnail to the gallery we need to use insertAdjacentElement instead of appendChild so we can add it to the beginning of the gallery, otherwise it would end up under the thumbnails.
insertAdjacentElement also moves existing elements instead of appending so here we don’t need to worry about double images either.
The thumbnails container has display: flex; so when we give each image an order property, we can make sure each image is moved back to the same position when it’s moved back to the thumbnails. We also need to give each image a unique view-transition-name.
Almost there…
We now have a smoothly animated image gallery but there is a small issue:
In the image, we see that the thumbnail that is moved to the gallery as the main image is now behind the next thumbnail in the container, and the main image is moved behind all thumbnails.
What we want is that the thumbnail that becomes the main image is in front of all other images and the current main image that is moved back is in front of all other thumbnails.
To accomplish this, we can add the class previous to the main image, the class next to the thumbnail that becomes the main image and then we set an appropriate z-index on both.
thumbnailsContainer.addEventListener('click', async (e) => {
  if (e.target.tagName === 'IMG') {
    const thumbnail = e.target;
    const mainImage = gallery.querySelector(':scope > img');

    // add the needed classes
    thumbnail.classList.add('active');
    mainImage.classList.add('previous');

    const transition = document.startViewTransition(() => {
      thumbnailsContainer.appendChild(mainImage);
      gallery.insertAdjacentElement('afterbegin', thumbnail);
    });

    // wait for the transition to finish
    await transition.finished;

    // remove the classes when the transition is finished
    thumbnail.classList.remove('active');
    mainImage.classList.remove('previous');
  }
});
.gallery {
...
> img {
...
/* main image that is moved to thumbnails */
&.previous {
z-index: 1;
}
}
}
.thumbnails {
...
img {
...
/* thumbnail that becomes main image */
&.active {
z-index: 2;
}
}
}Now the main image that is moved back has z-index: 1 and is in front of all thumbnails (that have z-index:0 by default) and the thumbnail that becomes the main image is in front of all others with z-index: 2.
Check the codepen:

Recap: animations DO work with ::part (in Safari and Firefox)
Last week, I wrote about animations not working when they’re applied to an element in a shadow root using ::part. To recap, the ::part() pseudo-element is used to apply styles to an element inside Shadow DOM. It enables you to apply multiple styles at once so you don’t need to expose a custom property for every CSS property you want to set:
This is how you would style an element inside a custom element (web component), for example <test-component>:
test-component::part(div) {
  width: 100px;
  height: 100px;
  background-color: red;
  animation: rotate 1s linear infinite;
}
where the element that’s styled has the part attribute:
<div part="div"></div>But I learned that the animation “rotate” in the previous example wouldn’t be applied in Chrome even though the @keyframes were defined outside the shadow root:
/* defined in CSS outside of <test-component> */
@keyframes rotate {
  from {
    transform: rotate(0deg);
  }
  to {
    transform: rotate(360deg);
  }
}
But as Bramus van Damme pointed out on Bluesky, it does work in Safari:

and when I tested it in Firefox, it worked there as well:
It turns out this is a bug in Chromium-based browsers that has to do with an incorrect implementation of author-defined CSS names combined with Shadow DOM. I may write an article about this in the future, but for now, I’d like to point you to the article by Noam Rosenthal that Bramus referenced in the Bluesky post above. If this interests you the article is well worth reading.
Here’s the codepen again that demonstrates the bug.
Anchor positioning now works in Safari Tech Preview 215 🎉
It was already partially working in previous versions but now the fallback positions work as well. position-area and the flip keywords flip-inline and flip-block haven’t been implemented (yet) so you’ll need to define positions with the anchor() function.
I also noticed that the fallback positioning doesn’t work correctly yet when resizing the screen, see the recording below:
I created a few codepen demos with the anchor() function, position-area, and the flip keywords.