

View transitions with a single line of CSS
Safari 18.2 now supports view-transition-name: auto to drastically simplify your CSS for view transitions on a single page.
I already shared this example before in another episode of Modern Web Weekly where the moving of a list item between two lists is animated. In case you missed it, here's the codepen:

It's a simple demo where you can click on an item in the Todo or Doing List to move it to the next list using the append method that all HTML elements support. By default, the moving of the list item will be instant but with view transitions you can animate this change.
All you need to do is give the element that is moved a unique view-transition-name and wrap the actual moving in a function and pass that to document.startViewTransition:
document.startViewTransition(() => {
  list.append(item);
});
The browser will figure out the difference in position for you and animate it automatically.
To make the animation even better I added a unique view-transition-name to all list items so their difference in position is also animated, which means they'll slide up when an item is moved away from the list to another one. And this illustrates exactly the problem: if you have large lists with a lot of items you would need to add a lot of CSS for all the unique view transition names.
Safari 18.2 now supports view-transition-name: auto that will let the browser figure out all the view transition names for you. So instead of having to do:
li:nth-child(1) {
  view-transition-name: list-item-1;
}

li:nth-child(2) {
  view-transition-name: list-item-2;
}

...
You can just do:
li {
  view-transition-name: auto;
}
which means you now literally only need a single line of CSS to animate the moving of a list item from one list to another with JavaScript.
Here's the updated codepen that uses view-transition-name: auto:

Not everyone is happy that Safari shipped it though.
The view-transition-name property is a draft spec and still under discussion so especially for Jake Archibald, the Safari team shipping this was an unpleasant surprise. You can follow the discussion here: https://github.com/w3c/csswg-drafts/issues/10995
PWA Audit: on your way to a great PWA
Do you already have a PWA but are you running into issues with performance, security, or functionality? Or are you not sure how to make your PWA better?
I can help you by running an audit of your PWA
I will evaluate it on more than 35 criteria and provide you with clear and actionable instructions on how to improve it. No generic stuff that you can get anywhere but an in-depth quality checkup to get you on your way to a great PWA.
Some of the criteria I will evaluate it on are:
Installability
Cross-device and cross-platform compatibility
Offline support
Usability
Effective use of modern web APIs
Performance
Security
Your investment in the improvement of your PWA through the audit is $499 excluding VAT (where applicable).
If you want to request an audit or first would like to know more you can
fill out the form or book a call with me.

Quick access to pages in your PWA with shortcuts
A PWA can provide quick access to URLs in the app through shortcuts. On desktop, these shortcuts are accessed by right-clicking the app icon when the app is running (macOS and Windows) or even when the app is not running on ChromeOS.
On Android, shortcuts are accessed by long-pressing the app icon on the Home Screen:
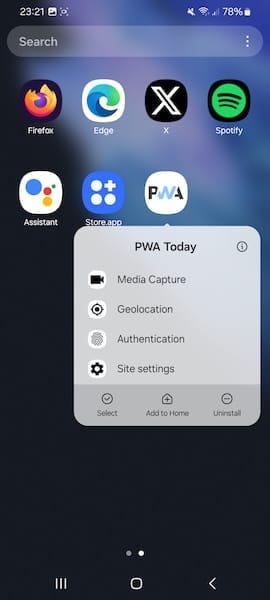
When a web app is added to the Dock on macOS, the shortcuts are also available in the File menu.
You can add shortcuts to your PWA by specifying them in the shortcuts key in the manifest.json file. Here's an example:
"shortcuts": [
  {
    "name": "Media Capture",
    "short_name": "Media Capture",
    "description": "Media Capture allows apps to use the camera and microphone of a device",
    "url": "/media",
    "icons": [
      {
        "src": "/src/img/icons/mediacapture-96x96.png",
        "sizes": "96x96"
      }
    ]
  },
  {
    "name": "Geolocation",
    "short_name": "Geolocation",
    "description": "Geolocation enables users to share their location with a web app",
    "url": "/geolocation",
    "icons": [
      {
        "src": "/src/img/icons/geolocation-96x96.png",
        "sizes": "96x96"
      }
    ]
  },

  ...

]
You can provide a name and a short_name for each shortcut. By default, name will be shown on desktop and mobile while short_name will only be displayed when there's not enough room to display name.
The description is currently not used but may be used in the future, for example, by assistive technology. The url points to the page that will be opened when the user clicks or taps the shortcut.
The icons are currently only shown on ChromeOS and Android and are defined in the same way as the icons in manifest.json.
You can provide icons in increments of 48dp (36x36, 48x48, 72x72, 96x96, 144x144, 192x192 px) if you need pixel-perfect icons. Usually, a single 192x192px icon will suffice.
You can check if your shortcuts work correctly by viewing the Application tab in Chrome Dev Tools and then clicking Manifest in the left pane. Scroll down and you should see your shortcuts listed including the icons if everything is done right:

Dead simple syntax highlighting with the CSS Custom Highlight API
If you have ever looked into the code of syntax highlighters like Prism.js for example you know that syntax highlighting is not an easy task. The text to be highlighted needs to be tokenized (broken into separate parts that need to be highlighted) and then those parts need to be wrapped in <span> elements that can be styled with different text colors.
Keep reading with a 7-day free trial
Subscribe to Modern Web Weekly to keep reading this post and get 7 days of free access to the full post archives.